

Brakes are one of the most important parts of any vehicle and require proper maintenance to ensure their safety and proper functioning. One of the maintenance tasks that may be necessary on Chevrolet Silverado 6.2L manufactured between 2015 and 2019 is brake pad repair. If not given enough attention and neglected, brake pads can cause serious problems and even cause dangerous accidents. In this article, we will help you walk through step-by-step how to replace and install your Silverado’s brake pads.
Tools needed
Before starting the brake pad repair, you need to have some tools: an impact wrench, a set of wrenches (13mm and 14mm), a torque wrench, a brake piston compressor, a c-clamp, brake bleeding kit, brake pad thickness gauge, among others that you can find in the manufacturer’s user manual.
Failure’s signs
A squeaking or squealing sound when you apply the brake, ineffective braking, vibrations in the brake pedal, and excessive brake pad wear are the most prevalent indicators that your Chevrolet Silverado 6.2L brake pads need to be repaired. If you notice any of these issues, you should take your vehicle to a reputable technician for an assessment and advice on the best repair.
Cautions to Perform a Succesful Replacement
Safety during the procedure: always operate in a well-lit and ventilated area, and find a flat place to work. Wear protective gear and equipment, such as heat-resistant gloves, safety glasses, and, if possible, a mask, to avoid being exposed to dust and other chemicals.
Checking the brake system: Before working on the brake system, ensure it is in good working order. Before and after the repair, take a light test drive to ensure that the brakes are working properly.
Tool handling: To repair the pads, use the necessary tools. Manufacturers recommend using high-quality tools to minimize costly braking system damage.
Handling brake fluid: Brake fluid is corrosive and can damage the paint and other components of the vehicle, it is also harmful to health if it falls on a sensitive area, such as the face. Take the time to cover important parts of the vehicle with protective plastic to prevent damage.
Caution with components: Keep in mind that brake system components are intended to endure high temperatures and are extremely heat sensitive. When using the brake piston compressor or similar tools, avoid overheating and damage.
Correct installation: When installing the pads, follow the manufacturer’s instructions. Incorrectly positioned installations, the use of wrong tools, or the use of incorrect parts for your vehicle type are examples of improper installation procedures.
Readjusting the emergency brake: Once the brake pads have been installed, make sure to properly adjust the emergency brake. It’s a good idea to get the emergency brake adjusted at a service shop to ensure it’s in good working order.
Chevrolet Models in this tutorial:Â
- Chevrolet Silverado 2015
- Chevrolet Silverado 2016
- Chevrolet Silverado 2017
- Chevrolet Silverado 2018Â
- Chevrolet Silverado 2019Â
broward county
Silverado 6.2L Front Disc Brake Pad Wear Sensor Replacement
WARNING: Brake Dust Warning
NOTE: Only the left front wheel is equipped with the front disc brake pad wear sensor.
Removal Procedure
- Raise and support the vehicle. Lifting and Jacking the Vehicle
- Remove the tire and wheel assembly. Tire and Wheel Removal and Installation (Aluminum Wheel) , or Tire and Wheel Removal and Installation (Steel Wheel)
- Disconnect the electrical connector. (1)
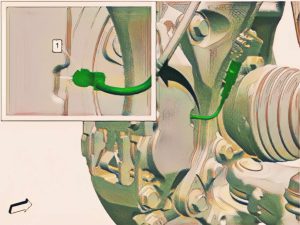
- NOTE: If sensor is worn from contact with the front brake rotor, then the front disc brake pads must be replaced as well. Front Disc Brake Pads Replacement

Chevrolet Silverado Front Disc Brake Pad Sensor Installation Procedure
- NOTE: Front disc brake pad wear sensor heads are brittle and should be handled with care when installing.
- Connect the electrical connector. (1)
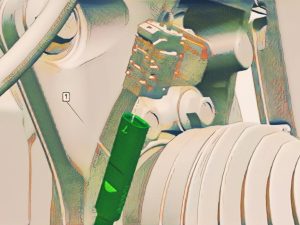
- Install the tire and wheel assembly. Tire and Wheel Removal and Installation (Aluminum Wheel) , or Tire and Wheel Removal and Installation (Steel Wheel)
- Remove the support and lower the vehicle.
- Using a scan tool, relearn the front disc brake pad wear sensor. Brake Pad Life Monitoring Reset

Silverado 2015-2019 Front Disc Brake Pads Replacement
WARNING:Â
- The battery must be disconnected to prevent the brake master cylinder from pressurizing the hydraulic system during its automated self diagnostic tests that can possibly occur when a door is opened or the key transmitter is activated. Failure to follow this precaution may cause personal injury.
- Brake Dust Warning
- Brake Fluid Irritant Warning
NOTE:
- Â Always replace disc brake pads in axle sets.
- Use all components included with the service kit.
- Â Only the left front wheel is equipped with the front disc brake pad wear sensor.
- If installing new brake pads, a NEW brake pad wear sensor must be installed.
Transparency and pofesionalism
are at the forefront of all our
automotive repair services.
Removal Procedure
- Inspect the fluid level in the brake master cylinder reservoir.
- If the brake fluid level is higher than midway between the maximum-full point and the minimum allowable level, remove brake fluid to the midway point before proceeding.
- If the brake fluid level is midway between the maximum-full point and the minimum allowable level, no brake fluid needs to be removed before proceeding.
- Disconnect the battery negative cable. Battery Negative Cable Disconnection and Connection (Without KL9) , or Battery Negative Cable Disconnection and Connection (With KL9)
- Raise and support the vehicle. Lifting and Jacking the Vehicle
- Remove the front tire and wheel assembly. , or Tire and Wheel Removal and Installation (Steel Wheel)
- Disconnect the electrical connector (1)

- Front Disc Brake PadWear Sensor (1) – Remove and DISCARD

- Front Brake Caliper Guide Pin Clip (1) – Remove [2x]
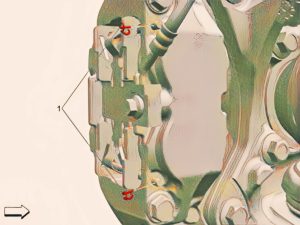
- Front Disc Brake Pad Retaining Spring (1) – Remove and DISCARD
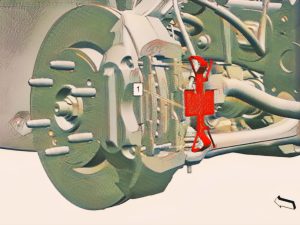
- Front Brake Caliper Guide Pin (1) – Remove [2x]
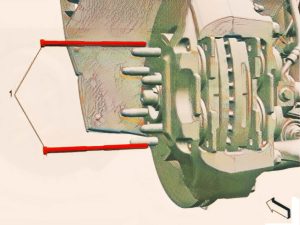
- Front Disc Brake Pad (1) – Remove [2x]
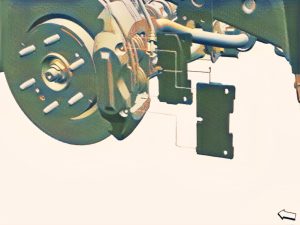
- Using an appropriate tool, carefully press the brake caliper pistons into the caliper bores until fully seated.

Removal Procedure
- NOTE: The disc brake pad must be positioned with the wear sensor at the disc brake pad leading edge.

- Front Brake Caliper Guide Pin
- Front Disc Brake Pad Retaining Spring

- Front Brake Caliper Guide Pin ClipÂ

- Front Disc Brake Pad Wear Sensor

- Connect the electrical connector

- Install the front tire and wheel assemblies. Tire and Wheel Removal and Installation (Aluminum Wheel) , or Tire and Wheel Removal and Installation (Steel Wheel)
- Connect the battery negative cable. Battery Negative Cable Disconnection and Connection (Without KL9) , or Battery Negative Cable Disconnection and Connection (With KL9)
- Remove the support and lower the vehicle.
- With the engine OFF, gradually apply the brake pedal to approximately 2/3 of its travel distance.
- Slowly release the brake pedal.
- Wait 15 seconds, then repeat steps 10 – 11 until a firm brake pedal is obtained. This will properly seat the front brake caliper pistons and front disc brake pads.
- Fill the brake master cylinder reservoir to the maximum-full level with GM approved brake fluid from a clean, sealed brake fluid container. Brake Master Cylinder Reservoir Filling
- {If equipped} Using a scan tool, relearn the front disc brake pad wear sensor. Brake Pad Life Monitoring Reset
- Burnish the brake pads and rotors:
- Select a smooth road with little or no traffic.
- Accelerate the vehicle to 48 km/h (30 mph).
- Using moderate to firm pressure, apply the brakes to bring the vehicle to a stop. Do not allow the brakes to lock.
NOTE: Use care to avoid overheating the brakes while performing this step. - Repeat steps 15.2 and 15.3 until approximately 20 stops have been completed. Allow sufficient cooling periods between stops in order to properly burnish the brake pads and rotors.
Chevrolet Silverado Rear Disc Brake Pad Wear Sensor Replacement
WARNING: Brake Dust Warning
NOTE: If sensor is worn from contact with the rear brake rotor then the rear disc brake pads must be replaced as well. Only the left rear brake caliper is equipped with a disc brake pad wear sensor.
Removal Procedure
- Raise and support the vehicle. Lifting and Jacking the Vehicle
- Remove the rear tire and wheel assembly. Tire and Wheel Removal and Installation (Aluminum Wheel) , or Tire and Wheel Removal and Installation (Steel Wheel)
- Rear Brake Bleeder Valve Cap

- Disconnect the electrical connector. (3)
- Rear Disc Brake Pad Wear Sensor (2) – Remove
Installation Procedure
- NOTE: Rear disc brake pad wear sensor heads are brittle and should be handled with care when installing.

- Connect the electrical connector. (3)
- Rear Brake Bleeder Valve Cap (1) – Install
- Install the rear tire and wheel assembly. Tire and Wheel Removal and Installation (Aluminum Wheel) , or Tire and Wheel Removal and Installation (Steel Wheel)
- Remove the support and lower the vehicle.
- Reset the brake pad life monitor system. Brake Pad Life Monitoring Reset

Repairing your brakes may be done fast and easily if you take the required precautions and use the proper tools. Bleeding the brake system and braking softly over the first kilometers with the new pads will ensure that your Silverado’s braking system works properly. Any problem with your vehicle’s brakes should never be taken lightly.
We hope this handbook was helpful and provided you with the information you required, but if you need assistance from a professional, AutoTech Mobile Mechanic can provide you with expertise and quality in brake pad repair services and much more, all in the comfort of your own garage. Furthermore, they have an experienced staff of brake and AA experts that will ensure that your Silverado’s brake pads are in top condition.
SCHEDULE AN APPOINTMENT TODAY
Our Mobile Mechanic Services in The Broward County Area
DAVIE, PEMBROKE PINES, MIRAMAR, COOPER CITY, WESTON, SOUTHWEST RANCHES, PLANTATION, TAMARAC, SUNRISE, FT LAUDERDALE
Davie Location
+600 positive reviews
Pembroke Pines Location
+240 positive reviews
What our clients says
Posted on Google Eduardo floresTrustindex verifies that the original source of the review is Google. I found the only honest, 100% reliable mechanic in south Florida. Manuel is professional, punctual and he knows the in and out of my car. I fully recommend him! Thanks for a great job!Posted on Google Marcos PaternosterTrustindex verifies that the original source of the review is Google. Professional service and very honest.Posted on Google Natasha EstevezTrustindex verifies that the original source of the review is Google. Manny was extremely knowledgeable and the most honest mechanic I’ve met. Even though there ended up being no repair needed on my car, he walked me through the diagnostic and explained what I need to look out for in the future. I will definitely go to him again and recommend him to my friends and family.Posted on Google Mike KingTrustindex verifies that the original source of the review is Google. Wheel stud replacement. I was in a jam and Manny came to the rescue. Very professional and honest. All around great mechanic and great guy. Highly recommend 10/10!Posted on Google James MoritzTrustindex verifies that the original source of the review is Google. Almost got a ticket today because of Manny! After having my struts and shocks replaced the car was running so smooth that I didn't realize how fast I was going....instead of feeling like I was in a paint shaker. First class individual, fair and honest pricing, and no waiting at the repair shop for hours on end! I recommend him without reservation, you will too!Posted on Google Dawn ProspectTrustindex verifies that the original source of the review is Google. Excellent service! Manny was very professional, communicated effectively regarding his arrival time and provided us with great information. I would definitely recommend his services.Posted on Google Joshua RosarioTrustindex verifies that the original source of the review is Google. This man is awesome. I just finished service with him. My nissan altima was not starting or reading the brake pedal. It wasn't providing any codes so finding the issue was not easy. Manuel took the extra steps to find what the issue was since it was outside the communication of the vehicle. Turned out there was an anti theft device on my car from the bank was improperly installed. He found the issue corrected the connection of the device and the car is good to go! An hour from the time I called he was able to get out to me. It's been exactly 1 hour and 20 mins since the initial call and my issue is resolved! Will be using him full time for any and all car repairsPosted on Google Irina M.Trustindex verifies that the original source of the review is Google. Manny is very professional and honest. We used his services twice and both times were very satisfied with the results. The first time, Manny diagnosed the origin of the issue we had with a headlight and the alert warnings on the dashboard of our Chrysler 300. During the second visit, Manny replaced two sensors on the same car. Both times the price was very reasonable and was given to us before starting the job. No surprises! Thank you, Manny. You are the best!Posted on Google Susan NeforesTrustindex verifies that the original source of the review is Google. Don't go anywhere else, this guy is the best! extremely smart and knows what he's doing. You will not be disappointed.Posted on Google Chantal CookTrustindex verifies that the original source of the review is Google. Help me out of a jam with a simple solution. Quick to responding to my problem!!!!